

Nowadays, as developers are increasingly mobile, having a secure and portable development environment is essential. Traditional setups that tie you to a specific machine or cloud-based solution may raise privacy and data-protection concerns.
This article covers how to build a secure and portable development environment powered with artificial intelligence that you can carry on an external USB-SSD - combining VeraCrypt for encryption, VirtualBox for virtualized local servers and the PortableApps Platform software to host tools like KoboldCpp (as the AI-server) and VSCodium as your main integrated development environment (IDE).
The result is a semi-portable, self-contained workspace that protects your data, supports AI-assisted coding and can be run across multiple systems with minimal setup - giving you the freedom to develop securely, anywhere.
Overview
We are building our environment for Windows systems as it is the easiest choice to make our development environment portable. Building for Linux systems require a lot more tricks and advanced knowledge. To build the above environment, you need the following tools:
- An USB-SSD device (as fast as possible);
- VeraCrypt (for encryption);
- VirtualBox (for virtualization; VirtualBox is actually not required, you can use any other virtualization or containerization tool you like, such as QEMU or Docker. I'm using VirtualBox because I want to run desktop operating systems on the same virtualization system too so it's my choice. Your situation may be different and the rest of the setup doesn't depend on this);
- PortableApps Platform software (for the rest of the development tools; this platform provides us a comfortable launcher environment that feels like a desktop OS within a desktop OS but it's not gonna hurt the performance as it's just a launcher that loads our portable development tools);
- PortableApps App Creation Wizard (this app provides the easiest way to put our development tools in the PortableApps Platform software);
- KoboldCpp (this is gonna be our local AI-server that loads LLMs (Large Language Models) into the memory and provides an API that our main development environment can connect to and use for AI-assistance);
- VSCodium (this is gonna be our main development environment. This is one of the best known open source IDEs that works well with AI-tools. This project is a fork of Microsoft's Visual Studio Code IDE. You can use any other IDE but it must be able to connect to KoboldCpp using OpenAI-compatible API.);
- Continue extension for VSCodium (this extension provides the connector for our local KoboldCpp AI server. It was designed for Visual Studio Code but also works with VSCodium.);
- Your preferred coder LLMs hosted on Hugging Face (this is completely your choice; you should select an LLM that works well on your system. Your system's performance defines how big (smart) language models you can run on your system that still responds in a reasonable time. It's constant compromise between intelligence and performance as the more intelligent your language model is, the slower it works on your system).
How to build the base system
This section provides you a simple step-by-step guide about how to build and configure the base system that you can start experimenting with.
Step 1: format and encrypt your USB-SSD
This is the most obvious part: you need to create one or more encrypted partitions on your USB-SSD that can host your development environment. How your partitions are created on your SSD is completely up to you, what matters is to have at least one encrypted NTFS partition on your SSD. it's quite simple to achieve:
- Create or format a partition on the SSD that you want to use as your encrypted filesystem;
- Start VeraCrypt, select Volumes -> Create New Volume... -> Encrypt a non-system partition/drive and follow the instructions of VeraCrypt! Whether you want to use a Standard VeraCrypt volume or a Hidden VeraCrypt volume (that provides plausible deniability as a plus) is up to you. When it asks you to select the device to encrypt, select the partition you created in the previous step and proceed to the next steps. Make sure you format the encrypted partition to NTFS so you can create your virtual machines or containers on it and store your language models along with them. VeraCrypt is quite straightforward about the encryption process and it is strongly recommended to follow its instructions carefully and make different choices only if you know what you are doing;
- Once your encrypted filesystem is created, mount it with the correct password or key!
Step 2: setup and configure VirtualBox
This is for my own local server environments, if you are using a different virtualization/containerization software, you can skip this step and proceed to the next one as the proper method for your own configuration may be completely different.
- Install and configure VirtualBox normally: nothing special in this part, just a completely normal installation. You can install all of your favorite extensions for VirtualBox, this will be our main hypervisor for our local servers and it needs to be installed normally otherwise you will have to reinstall VirtualBox drivers every time you want to start a virtual machine (like in the case of a truly portable VirtualBox system) and this is exactly what we want to avoid; we want to make running virtual machines as simple as possible. When it asks where you want to store your virtual machines, create and select a folder on the encrypted filesystem we created in the previous steps;
- Create your virtual machines normally: once VirtualBox is installed, configured and fully functional, create or import your virtual machines just like every time you do. You may want to pay extra attention to the networking settings as you probably want to install Git or SVN on your virtual development servers and proper network configuration is essential to access them. The easiest is obviously using a bridged networking connected to one of your physical network adapters you are using to access the internet or your local area network (LAN);
- Backup the main VirtualBox configuration file: this is the tricky part, because all machine IDs and locations must be the same on all of your computers you want to use your virtual machines on and this is where VeraCrypt helps a lot as it lets you select the drive letter you want to use for mounting your encrypted filesystems. Make sure you always select the same drive letter on all of your computers otherwise VirtualBox will not find your virtual machines!
- Create a folder on your encrypted filesystem for the main configuration file of VirtualBox usually located in
C:\Users\<your_username>\.VirtualBox\VirtualBox.xmland copy this file to that folder! This is a normal XML file and this is where your machine IDs and locations are stored for VirtualBox; When you install VirtualBox on another computer you want to use this development environment on, you have to update the main configuration file of VirtualBox on that machine using the information from the file you copied at the previous step. Make sure you install the same version of VirtualBox on that computer otherwise it may not work and you risk corrupting your virtual machine's integrity when starting it. This is the interesting part of the XML file you copied:
...
<MachineRegistry>
    <MachineEntry uuid="{your_machine_uuid}" src="the location of the virtual machine"/>
...
</MachineRegistry>
...
This must be the same on all of your computers! You can find this section toward the end of the file. When you delete a virtual machine, you must synchronize this file on all of your systems you are using this development environment, the same goes for removing and/or (re)importing! When you create a new virtual machine, you must also update its own configuration file (
your_virtual_machine.vbox) in the virtual machine's folder. You have to manually edit and update this section of the file:<Machine uuid="{your_new_machine_uuid}" name="The name of your virtual machine" OSType="Your OS type" snapshotFolder="Snapshots" lastStateChange="2025-11-09T15:46:41Z">The machine UUID in this file must match the machine UUID in the other configuration file assigned to this virtual machine on all of your computers with the locations as well! When everything is configured properly, VirtualBox should be able to find your virtual machines on all of your computers applied for this setup, no matter into which computer your USB-SSD is plugged into. To actually start your virtual machine successfully, you may have to open its settings in VirtualBox GUI and make sure all of your virtual devices are connected to the proper physical adapters of your host system (as it may differ on each computer) otherwise your virtual machine may fail to start until you change its settings correctly.
- Create a folder on your encrypted filesystem for the main configuration file of VirtualBox usually located in
Step 3: setup PortableApps Platform software
This is the easiest part: simply download PortableApps Platform software and extract it to your encrypted filesystem on the USB-SSD. Once it's extracted, start adding the apps you need for development: launch Start.exe, select Apps -> Get More Apps... -> By category and select all the apps you want to install from the list. It's a long list and it's completely your choice what you want to install. I installed a lot of things starting from Database Browser, Geany, Notepad++ and a huge set of other development tools to multimedia tools. I also have a lot of other, custom apps those are not available in PortableApps software repository; I packaged them and added to my PortableApps container for my own convenience. You can also do this with the following apps so make sure you install them:
- PortableApps App Creation Wizard: this app is actually not available in the repository but you can download it from this GitHub repository: https://github.com/AetherCollective/PortableApps-App-Creation-Wizard and you can install it manually into your PortableApps container and is recommended for beginners. You don't actually need it if you are an advanced user, have enough experience with PortableApps Platform and you know what you're doing;
- PortableApps Launcher: if you already have an application with the appropriate folder structure in your PortableApps container but the launcher is still missing, or for some reason you have to regenerate it, you can use this application to generate the launcher for you. If everything is configured properly and the launcher is generated successfully, PortableApps Platform software should be able to find this application immediately after refreshing the application icons and it should be shown on your application list at the corresponding group;
- PortableApps Installer: you can use this application to generate an installer package for your portable application if want to redistribute it. Make no mistake: the generated package still contains a portable application and is not a normal installer for Windows. It simply extracts your application to the selected folder. This package is for PortableApps Platform software only so it can add your application to its container with only a few clicks if it doesn't contain it already. I actually never used it, as I usually backup my entire PortableApps container not just a few applications from it, but it makes the process very user-friendly.
We will use the first 2 only to create our portable AI server and the IDE using it in our PortableApps container.
Step 4: setup KoboldCpp AI server
Now finally we got to the interesting part :) KoboldCpp software is built on llama.cpp and it makes very easy to setup your own AI server. It provides a user-friendly GUI to configure almost everything about your AI server. To get your AI / LLM server working, follow the instructions below:
Create an empty folder, download and run KoboldCpp, then select Extra -> Extract KoboldCpp Files and extract it to that folder, then quit the software and go to the directory you extracted KoboldCpp into;
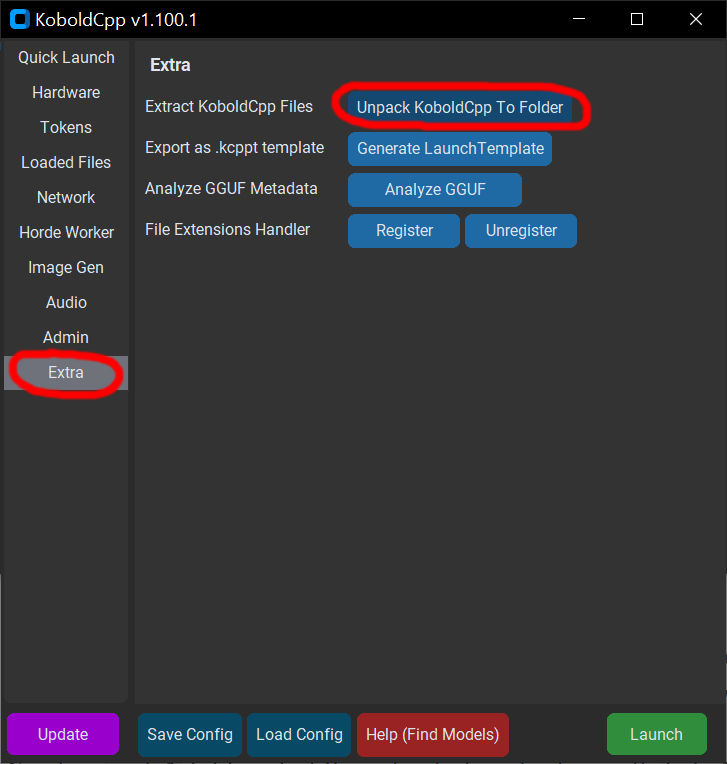
Extracting KoboldCpp files Create a
modelfolder, start the extracted application withkoboldcpp-launcher.exe, then select Quick Launch -> GGUF Text Model -> HF Search (Hugging Face search). This will open an advanced search window and lets you find your preferred model to download; this is completely your choice and you may have to do an extensive research to find out which language model works best for your system! There are many LLMs for various tasks, in this article we are interested only in coder and debugger models. There are also multiple models for coding and debugging and it's also your choice to select the one that works best for you. I'm currently usingdeepseek-coder-33b-instruct.Q4_K_Mas it seems to have the best performance/usability ratio on my system but this isn't a final decision; I am constantly changing models to find the best fit for my system, along with proper fine-tuning. You can try out Qwen or Mistral too;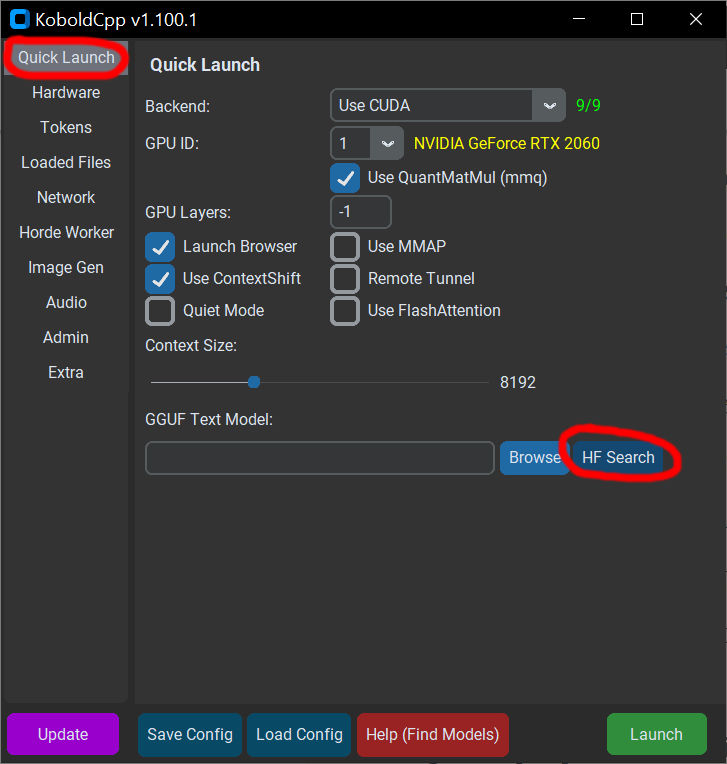
Searching for language models - After selecting your preferred model and quant, click on Confirm Selection but do not launch the LLM service yet! At the GGUF Text Model section, select the entire URL, copy it to the clipboard, open a web-browser and paste it in its URL field, then start downloading the language model to your
<KoboldCpp root>/modelsfolder. We want this model to be always available for the software so we put it in its directory. If you want to try out any additional model with KoboldCpp, feel free to download it in this directory; - When the download process is finished, click Browse button in KoboldCpp software and select the language model file you just downloaded, then go through on all the options in the software and carefully set them to fit your system. The most important settings are the threads, context-size, GPU layers and main GPU settings. These settings strongly determine the performance of your LLM server and it's not easy to set them correctly as you always have to find the best compromise between usability and performance;
- Once you're done configuring your LLM server, click Save Config and save your configuration file somewhere in your encrypted filesystem; I recommend PortableApps Platform software's own Documents folder as it's the easiest to find from its launcher. Once you saved your config, you can now launch the LLM server by clicking Launch. Loading a language model may take a long time so wait patiently. Once loading is finished, your default web browser should open, and you can test your AI server by following the instructions on the automatically opened page by the launcher;
- When you finished testing you can stop the server by activating the console window that was launched and kill all process simply by pressing CTRL+C. You can launch KoboldCpp again, load your previously saved configuration file for fine-tuning if necessary and test it again by repeating the same steps above;
After testing your LLM server, create a batch file named
start_llm_server.batin KoboldCpp root directory with the following contents:@echo off REM ============================= REM Portable KoboldCpp Launcher REM ============================= REM Set working directory cd /d "%~dp0" REM LLM CONFIGURATION REM change the line below to match the language model you downloaded set MODEL_PATH=models\deepseek_coder_instruct_q4.gguf REM PERFORMANCE CONFIGURATION set PORT=5001 set THREADS=6 set CTX=10240 set GPULAYERS=-1 set MAINGPU=1 echo ==================== echo Launching KoboldCpp echo Model: %MODEL_PATH% echo Port: %PORT% echo Context: %CTX% echo Threads: %THREADS% echo GPU layers: %GPULAYERS% echo Main GPU: %MAINGPU% echo -------------------- koboldcpp-launcher.exe --model "%MODEL_PATH%" --threads %THREADS% --contextsize %CTX% --gpulayers %GPULAYERS% --maingpu %MAINGPU% --usecuda normal 0 mmq --port %PORT% --quiet --multiuser 1 --skiplauncher echo [INFO] KoboldCpp API is running at: http://localhost:%PORT% echo [INFO] Press any key to close this window. pause >nuland change the settings in it to match the ones in KoboldCpp that worked best for your system at the testing phase. This file will launch the LLM server with the above settings without opening its GUI or a web-browser. To stop the service, simply kill the process by pressing CTRL+C;
- Finally, let's put our portable LLM server into our PortableApps container so it is easy to start and configure when needed! To do this, you can use PortableApps App Creation Wizard and follow its instructions or build the proper folder structure manually in your PortableApps container, then move KoboldCpp folder in the
Appfolder. When it is about to define the main executable for your portable application, selectkoboldcpp-launcher.exe(and not the batch file as you may want your settings easily available). Once selected, start the app creation process or use the PortableApps.com Launcher app to create the launcher for your portable LLM server. Once finished, refresh the application icons in your PortableApps container and your LLM server should be shown on the application list if configured properly.
Step 5: setup VSCodium and connect it to KoboldCpp
This is where we finally setup our IDE and add an AI to it. When everything is configured properly, you should have a smart development environment with a helpful AI assistant. To setup this IDE, follow the steps below:
- Download VSCodium and extract it to an empty folder. Let's call this folder simply
VSCodium. Go to that folder and create a new folder in it:data. This tells the application to behave like a portable version, so user data is stored in thedatafolder and not in your user profile in Windows. Some extensions may and will still want to store your user data on your Windows partition and that's where PortableApps Platform software comes handy: it will force those extensions to keep user data in your PortableApps container; Turn VSCodium into a standard application in your PortableApps container so it can be managed easier! This is done just like in the previous step with KoboldCpp but with a few changes.
First, your
App\AppInfo\appinfo.inifile should look like this:[Format] Type=PortableApps.comFormat Version=3.0 [Details] Name=VSCodium Portable AppID=VSCodiumPortable Publisher=Tim O'Brien Homepage=https://vscodium.com/ Donate= Category=Development Description=VSCodium is a community-driven, freely-licensed binary distribution of Microsoft’s editor VS Code Language=Multilingual Trademarks=VSCodium InstallType= [License] Shareable=True OpenSource=True Freeware=True CommercialUse=True EULAVersion= [Dependencies] UsesGhostscript=No UsesJava=No UsesDotNetVersion= [Control] Icons=1 Start=VSCodiumPortable.exe [Associations] FileTypes= FileTypeCommandLine= FileTypeCommandLine-extension= Protocols= ProtocolCommandLine= ProtocolCommandLine-protocol= SendTo= SendToCommandLine= Shell= ShellCommand= [FileTypeIcons] [Version] PackageVersion=1.105.17075.0 DisplayVersion=1.105.17075Second, make sure you have the following contents in your
App\AppInfo\Launcher\VSCodiumPortable.inifile:[Launch] Name=VSCodiumPortable ProgramExecutable=VSCodium\VSCodium.exe ProgramExecutable64= ProgramExecutableWhenParameters= ProgramExecutableWhenParameters64= CommandLineArguments= WorkingDirectory=%PAL:AppDir%\VSCodium [FilesMove] [DirectoriesMove] continue=%USERPROFILE%\.continue vscode-oss=%USERPROFILE%\.vscode-oss [DirectoriesCleanupIfEmpty] 1=%USERPROFILE%\.continue 2=%USERPROFILE%\.vscode-oss [RegistryKeys]The most important part is the
[DirectoriesMove]and the[DirectoriesCleanupIfEmpty]sections. the first section tells the PortableApps launcher to move theData\continueandData\vscode-ossfolders into your Windows profile so VSCodium and the Continue extension can read and write without issues. At the end of the session, the launcher moves them back to the PortableApps container in theDatafolder on closing VSCodium, the second one tells the launcher to cleanup all leftovers (if any) in those directories in your Windows profile so there won't be unnecessary empty folders left in your system. Make sure no other application is using these folders otherwise this application may break them!
Create
continueandvscode-ossfolders in theDatafolder of your new portable application, generate the launcher for VSCodium and when it successfully builds, refresh the application icons in your PortableApps container.- Launch VSCodium, follow its instructions, make the necessary changes in your settings and install Continue extension for VSCodium in your Extensions panel. This extension will connect to your LLM server and let you use your local AI assistant in VSCodium IDE;
Open Continue panel, go to Settings -> Configs -> Local Config and click Open configuration button to create your
config.yamlfile that's needed for connecting to KoboldCpp. Add the following contents to the file:name: Local Config version: 1.0.0 schema: v1 models: - name: DeepSeek Coder Instruct provider: openai model: deepseek_coder_instruct_q4 apiBase: http://localhost:5001/v1 roles: - chatChange
modelto the readable name of the language model you actually want to use andmodelto the filename (without extension) of the language model you already put inmodelsfolder of your KoboldCpp application in the previous steps! You can use any compatible language model but it must always match the setting instart_llm_server.bat. Theprovideris theopenaicompatible interface. Currently, only chat mode is supported with KoboldCpp. You may also need to change port number from 5001 to the one you defined at KoboldCpp settings. Save your settings, go back to the chat interface and close VSCodium;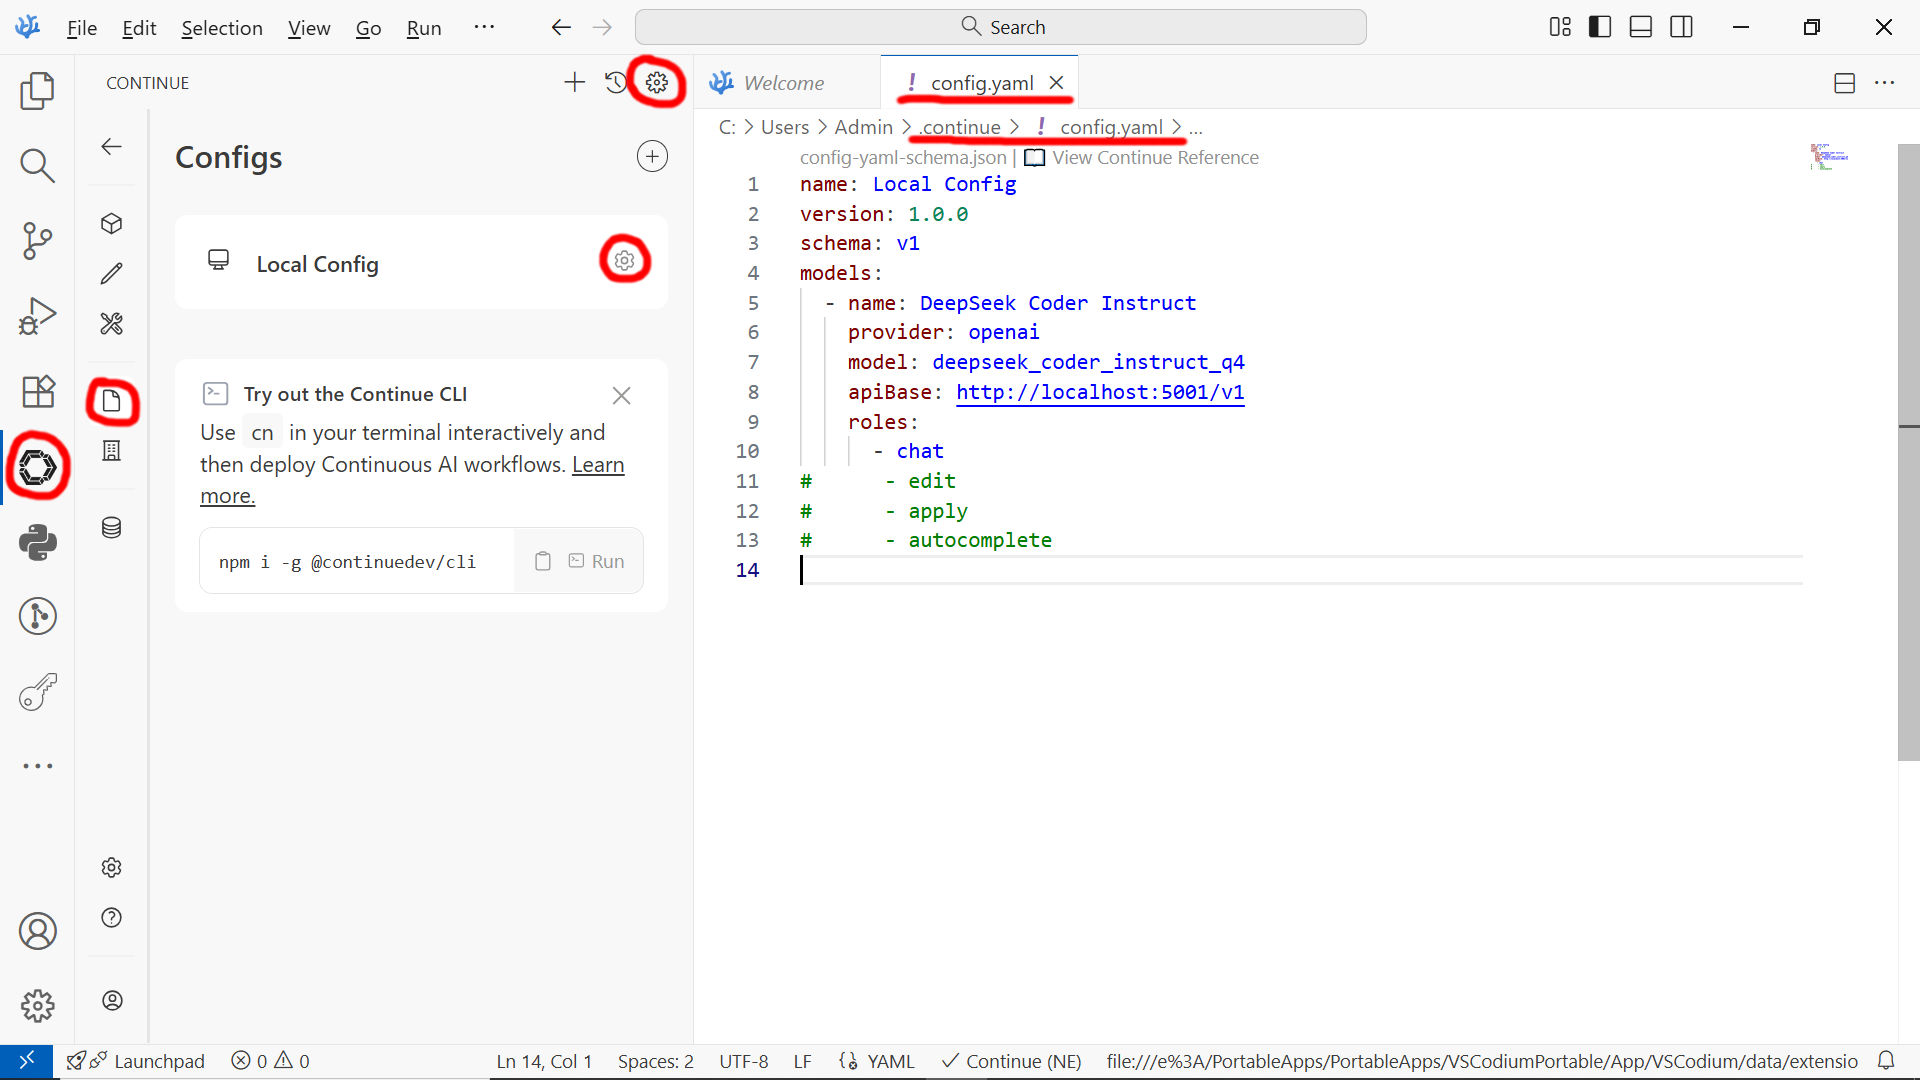
Configuring Continue extention - Go to KoboldCpp application directory (not the launcher but the one KoboldCpp actually resides) and launch
start_llm_server.bat, then wait until it is fully loaded and the LLM API interface is available; - Launch VSCodium again, open one of your projects or create a new, and then you can start coding with your new local AI assistant!
Final Notes, Usage Tips and Future Improvements
At this point, you have a fully operational, encrypted and portable development environment that combines virtualized services, a local AI-powered coding assistant and a complete IDE you can run on any Windows computer. The entire system depends only on your USB-SSD and the drive letter you assign to it with VeraCrypt, which makes your workflow consistent and predictable across multiple machines without compromising security.
While this setup is already powerful, there are several improvements you may want to explore:
- Automating routine tasks – you can use batch files or PowerShell scripts to automatically mount your encrypted drives, launch your virtual machines or start the LLM server when needed.
- Managing multiple language models – KoboldCpp makes it easy to switch between different models. You can store several coder, debugger or reasoning models and load whichever one fits your current task.
- Keeping your toolchain updated – PortableApps Platform software makes updates simple, but for custom apps (like KoboldCpp or VSCodium), it’s worth occasionally checking for new releases and refreshing your portable container.
- Optimizing performance – fine-tune your LLM configuration (threads, GPU layers, context size) to achieve the best balance between responsiveness and accuracy based on the hardware of each machine you use.
- Extending the environment – since this is your personal platform, you can add other tools such as databases, browser automation software, documentation systems or even full server stacks depending on your needs.
The main advantage of this approach is that your data, your tools and your AI models remain under your control. There is no cloud dependency, no vendor lock-in and no online service tracking your activity. Everything stays inside your encrypted disk — portable, secure and ready to go.
With this foundation in place, you can continue building your own customized development environment that grows with your workflow. Whether you use it for software development, research, security analysis or prototyping, this portable AI-powered workspace helps you stay productive and protected wherever you are.
Thank you for reading! Enjoy creating with your new portable AI development environment and remember: no matter which language model you are using, you just don't want to blindly accept what it generates...
Comments