This is an old blog post dated 2014-06-09 from my original Blogger account. System configurations and available software versions changed since then but I think it still works on modern systems, maybe a few modifications have to be made to suit your needs.
So, I just bought a new, Lenovo Y510p notebook, which will be used for software development, including commercial information systems, where it is very important to secure customer and other sensitive data carefully. Whatever happens to my notebook, the data on it must not be in the wrong hands. I needed to find a way to make sure all data is safe.
This post will cover how you can create a relatively safe, Windows 7 - Ubuntu dualboot system where Windows partition is encrypted with the free and opensource DiskCryptor program. Since Microsoft does not provide BitLocker on Windows 7 Professional our choice is this 3rd party software.
System specification
- Operating systems: Microsoft Windows 7 Professional OEM and Ubuntu 14.04
- Boot-mode: legacy/MBR
Partitions
- Windows 7 system partition with bootloader (primary partition, NTFS filesystem, no dedicated system reserved partition, otherwise we cannot encrypt our Windows 7 partition with DiskCryptor because the system will fail to boot)
- SWAP partition for Windows virtual memory (logical partition, NTFS filesystem, just to make sure Windows virtual memory will not make fragmentations on the system partition, I recommend it to be at least twice as big as the RAM in your machine)
- Data partition (logical partition, NTFS filesystem, all backup should go here)
- Ubuntu Linux system partition (primary partition, EXT4 filesystem, mount point is "/")
- SWAP partition for Linux (uses special filesystem, it can be created during Ubuntu installation process. It should have the same size that our Windows SWAP partition has)
Booting method: Ubuntu's Grub 2 bootloader goes in the MBR (masterboot record), it will load eiter Ubuntu or Windows depending on what you choose on startup. Encrypted Windows cannot boot from Grub 2 by default, but we can make it boot using Ubuntu's memdisk program, which will load our DiskCryptor bootloader and that will make our Windows boot.
Used partition manager to create additional partitions listed above: any kind of partition manager will do the job for us but, because at first we create and remove partitions in Windows, we choose a partition manager that runs on Windows. I recommend EaseUS Partition Master because it's free.
Step-by-step guide
In my case, the notebook was new, the HDD was empty, what may be different in your case, so you may want to skip some of these steps or do things differently. It is essential to backup all of your data on external devices and you should follow these steps at your own risk! Here's what I did to make things work:
- I started with an empty HDD (or almost empty, with FreeDOS on it). Storage capacity is 1 TB. I put my Windows 7 installation disc in my DVD drive (because of the dedicated video card, there is no internal DVD drive in my notebook so I had to use an external USB drive and change BIOS settings to boot from it). I deleted all partitions on the HDD, created a 250 GB-sized primary partition and installed Windows on it. System reserved partition, what we want to remove later, was created automatically.
- After Windows had been installed successfully I installed EaseUS Partition Master and created a 32 GB logical partition directly after Windows partition. I gave this new partition a "SWAP" label. Then, I created a larger logical partition (about 370 GB) and labelled it as "DATA". Both new partitions have NTFS filesystem but, since I have an SSHD, I have optimized the SWAP partition for SSD. This partition is reserved for the virtual memory so leave it empty!
- I have changed Windows system settings: disabled virtual memory on all partitions and enabled virtual memory on the SWAP partition. Its size is handled by Windows but its limit is the size of the partition. Then, I disabled system restore service on all partitions except on Windows partition. When I was done, I rebooted Windows to apply changes.
- Here comes the first trick: we cannot encrypt Windows partition until Windows partition and its system reserved partition is united. We have to enable booting from Windows partition (with C: drive letter).
- There is a command line tool provided by Microsoft and it is called "BCDboot". This will let us create a Windows bootloader on the C: drive. To create this bootloader successfully, we must run CMD as system administrator to make sure it has all privileges to successfully create boot data (Start menu --> search for CMD --> right-click on it --> Run as administrator). When it opens, we run the following command:
bcdboot c:\Windows /s c:
Now our new bootloader must be created successfully. - Now, we open Windows disk management utility from Control panel, right-click on Windows partition and mark it as active. For now Windows will use the newly created bootloader and boot from its own partition, the system reserved partition is no longer necessary and can be removed. We do this via disk management utility or our preferred partition manager then we restart Windows to see if it can boot. Once Windows it booted up, we run our partition manager and expand Windows partition to fill the free place from wich we removed the system reserved partition. Then we reboot our Windows again to apply changes.
- There is a command line tool provided by Microsoft and it is called "BCDboot". This will let us create a Windows bootloader on the C: drive. To create this bootloader successfully, we must run CMD as system administrator to make sure it has all privileges to successfully create boot data (Start menu --> search for CMD --> right-click on it --> Run as administrator). When it opens, we run the following command:
- Now Windows could be encrypted, but we want to make sure that we encrypt a system partition free from any kind of errors. First, we run Windows scandisk to fix all possible filesystem errors. This will force us to reboot our Windows. When filesystem is clear, we run Windows defragment tool on it to make sure data is consistent. This may take a long time. When it is completed we run Windows scandisk again to make sure there is no filesystem error caused by defragmentation process. When it is done and the filesystem is clear, Windows is prepared for encryption.
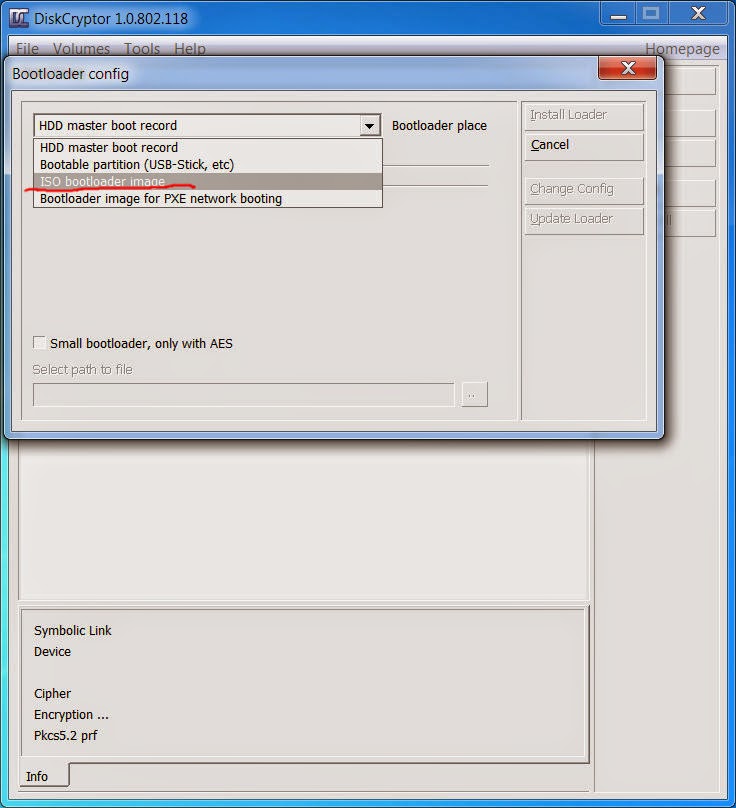
- We install DiskCryptor, run it as administrator and from the main menu we create an ISO file for the bootloader:

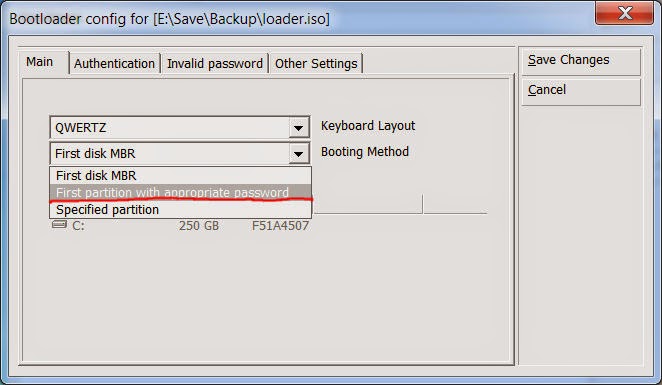
Creating DiskCryptor bootloader image - Then we configure this bootloader ISO to boot from the first partition where the password is correct:

Configuring bootloader image - Make sure this bootloader ISO is stored on your DATA partition so Ubuntu will have access to it after it is installed! Ubuntu won't be able to read anything from the encrypted Windows partition so it is important to place this ISO file somewhere else.
- We encrypt Windows partition using DiskCryptor. This may take a long time. Make sure that all other applications are closed at this time. Also note that Windows won't be able to boot after the encryption process finishes because its bootloader will be encrypted too and DiskCryptor bootloader is stored on the ISO file which is not loaded by startup! Only the ISO file will be able to load Windows bootloader after we supply the correct password! Now we have no bootable partition on our HDD, so it's time to install Ubuntu.
- We install Ubuntu on the end of our HDD (the large unallocated free space in my case, create a 250 GB EXT4 filesystem for Ubuntu and a 32 GB SWAP partition as it was explained in the system specification above). When Ubuntu is installed successfully it will bale to boot but it still won't be able to see the encrypted Windows system.
- We boot into Ubuntu, mount the partition where DiskCryptor ISO bootloader is located, open a root terminal and copy this ISO to the /boot directory on our Ubuntu filesystem.
- Still we won't be able to see our Windows so we edit /etc/grub.d/40_custom file and make it look like this:
#!/bin/sh
exec tail -n +3 $0
# This file provides an easy way to add custom menu entries. Simply type the
# menu entries you want to add after this comment. Be careful not to change
# the 'exec tail' line above.
menuentry "Encrypted Windows 7 Professional" {
linux16 /boot/memdisk iso
initrd16 /boot/<NAME_OF_YOUR_DISKCRYPTOR_ISO_FILE>
}
Save and exit. - We run the following command to make sure Grub 2 will be able to load memdisk program:
ln -s /usr/lib/syslinux/memdisk /boot/memdisk - Now we must update the Grub 2 bootloader so it can find memdisk and our ISO file:
update-grub - We are done, we reboot our computer to see the changes.
If the process was successful and you can boot into your encrypted windows I recommend you to backup the ISO and the 40_custom configuration file on the DATA partition so if you have to reinstall any of the systems they can be restored easily.
Note that I wrote this tutorial after I successfully created my dualboot system, from my memories, after lots of testings to find the optimal solution, I didn't copy here any of the commands but the configuration files, there may be some typing mistakes, so use this tutorial with extreme caution! Basically, this is the short version of what I did.
I hope it helps you.
UPDATE I.
I had a few problems with the 250 GB Ubuntu (EXT4) partition; sometimes, when turning the notebook on, the system just didn't want to boot (error: attempt to read or write outside of disk 'hd0'). I found out it might be the problem with the old 137 GB limitation of boot partitions. Making sure the HDD access mode in BIOS is SATA (AHCI) suggested on several forums didn't help me out. I decided to resize Ubuntu partition to 120 GB (which is still more than enough) and create a TrueCrypt-encrypted NTFS logical partition on the new unallocated free space.
Now I have an encrypted logical partition on my HDD, where both Linux and Windows has access, and I can archive my sensitive files on it or transfer data securely between the two systems without the risk of leaving unencrypted fragments on the physical free space after removing the files or being unable to access encrypted data when one of the operating systems gets corrupted.
UPDATE II.
Reading after the 137 GB BIOS-limit and still experiencing boot-problem it turned out that the 137 GB limit affects the whole drive not just primary partitions, which means that all operating systems should be in the first 137 GB block of the HDD. This is obviously not possible since I need at least 120 GB of space for both operating systems. I decided to decrypt Windows partition, resize it to 120 GB (so at least Windows will take the first 120 GB block) then re-encrypt it. Still Grub bootloader is at the end of the HDD so I don't expect that it will solve the problem just making the system a bit more stable.
Probably the real solution is to put Grub to a separate partition (with Memdisk and DiskCryptor bootloader) right after Windows and make MBR point at it so the bootloader will be located in the first 137 GB block and it will be able to load both operating systems. Furthermore, because Grub needs a Linux kernel to override the BIOS-limit, I'll put the latest kernel on that partition pointing at the original root filesystem so Linux should be able to boot after that even if the BIOS-limit is still affecting the system.
UPDATE III.
So this is what I did so far: as it is in the second part of UPDATE II, I moved Windows SWAP partition 2 GB further and created a new, logical EXT 4 partition between the 120 GB-sized, encrypted Windows partition and its SWAP partition. The new EXT 4 partition is called /dev/sda8 in Linux system, while the original Linux partition is called /dev/sda2. This applies to my configuration only, it might be different on your computer. I just wanted to create a simple, separate boot partition for Ubuntu, which is expected to be able to boot all the time, so I created the boot partition as a logical partition (which works on my system) but a few systems may require it to be a primary partition or have a boot flag (however Grub 2 itself doesn't care about it at all).
- The next step is to install Grub 2 on the new boot partition and make it point at the original Linux system. I did this with normally booting into Linux, opening a root terminal and mounting the new partition to /mnt with the following command:
mount /dev/sda8 /mnt
then I installed Grub on it with the following command:
grub-install --root-directory=/mnt /dev/sda - Of course, it is not enough, since Grub still doesn't see the original menu entries for now, we have to synchronize it with the new Grub bootloader. To do this, I had to run the following command:
grub-mkconfig -o /mnt/boot/grub/grub.cfg - This is enough to boot up Linux but not enough to boot up Windows. Grub will not be able to find its bootloader until we copy memdisk and the bootloader ISO file on the new partition. I did this with the following commands:
cp /usr/lib/syslinux/memdisk /mnt/boot/memdisk
and
cp /boot/win7loader2.iso /mnt/boot/win7loader2.iso
then I ran update-grub and the grub-mkconfig commands again. After that, I dismounted the partition by running umount /mnt.
This should be enough to boot up one of the operating systems but what happens when the BIOS-limit prevents Grub from finding the desired Linux kernel? To make sure Grub always finds a Linux kernel to boot we have to copy the latest working kernel and its init script to the new partition and tell Grub where to find them.
The only problem is that I would have to do this (and running the grub-mkconfig command) again and again after upgrading my Linux system and getting a new kernel from the repository, and it would really annoy me after the fifth time. I want to make this an automatic progress. The solution is not run update-grub directly but writing a script, which does the dirty work for me instead.
- To make this more comfortable, first I have to append my /etc/grub.d/40_custom file by adding the following lines before or after the Windows-menu entry:
menuentry "Secondary Linux Kernel (for recovery only)" {
set root=(hd0,msdos8)
linux /boot/vmlinuz root=/dev/sda2 ro quiet splash
initrd /boot/initrd.img
}
This will make sure Grub will see the dedicated Linux kernel too. Remember: (hd0, msdos8) is the new boot partition as Grub will see it in its command-line tool and /dev/sda2 is my original Linux partition. This might be different on your system. Use fdisk -l command to check the paths of your partitions in terminal. - Still Grub won't see anything of the secondary Linux kernel since there isn't any. We always place the latest kernel on the boot partition by running our own update_grub.sh script. So we create a new update-script as /root/update_grub.sh with the following content:
#!/bin/bash
#Change sda8 to the partition where you installed the dedicated bootloader
#Run this script only as root!!
echo Mounting boot partition...
mount /dev/sda8 /mnt
echo Backup latest Linux kernel for recovery...
vmlinuz_latest=`ls /boot/vmlinuz* | sort | tail -n 1`
rm /mnt/boot/vmlinuz
cp $vmlinuz_latest /mnt/boot/vmlinuz
initrd_latest=`ls /boot/initrd.img* | sort | tail -n 1`
rm /mnt/boot/initrd.img
cp $initrd_latest /mnt/boot/initrd.img
echo Updating grub bootloader...
update-grub
echo Updating the dedicated bootloader...
grub-mkconfig -o /mnt/boot/grub/grub.cfg
echo Unmounting boot partition...
umount /mnt
echo Done.
make sure you restrict file permissions by granting write/execute privileges to root user only! You can do this by running the chmod-command. - When you're done with the editing, close the script and execute it as root. You run this script after all kernel-upgrades so you make sure Grub will use always the latest kernel for recovery when Linux is unable to boot normally.
UPDATE IV
To make Grub-updater script more secure (due to recent updates of Grub bootloader itself) I added command "grub-install --root-directory=/mnt /dev/sda" to the script right before the grub-mkconfig command so always the latest Grub version will be present on the bootloader partition. Now the script look like this:
#!/bin/bash
#Change sda8 to the partition where you installed the dedicated bootloader
#Run this script only as root!!
echo Mounting boot partition...
mount /dev/sda8 /mnt
echo Backup latest Linux kernel for recovery...
vmlinuz_latest=`ls /boot/vmlinuz* | sort | tail -n 1`
rm /mnt/boot/vmlinuz
cp $vmlinuz_latest /mnt/boot/vmlinuz
initrd_latest=`ls /boot/initrd.img* | sort | tail -n 1`
rm /mnt/boot/initrd.img
cp $initrd_latest /mnt/boot/initrd.img
echo Updating grub bootloader...
update-grub
echo Updating the dedicated bootloader...
grub-install --root-directory=/mnt /dev/sda
grub-mkconfig -o /mnt/boot/grub/grub.cfg
echo Unmounting boot partition...
umount /mnt
echo Done.
I expect this to be the final version of the script.


Comments