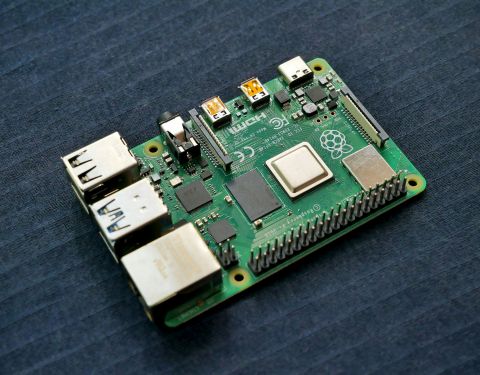
Ever bought a Raspberry Pi device and wanted to know how you can use a such small but fully customizable device in your daily life? Thought about using it as a server when you develop applications? Or just wanted to store your personal files in a secure server locally that you can access from any device on your network but doesn't have as high power consumption as a normal server and is quiet enough to be placed in your room while you are sleeping next to it? Have some IP cameras and you want to store your records in a safe place not just on the SD cards plugged in your cameras? Well, in that case, a Raspberry Pi device may be a perfect choice for you! This article covers how you can build a secure, encrypted mini-server on a Raspberry Pi device using VeraCrypt encryption system and LXD containers. What this article will not cover is what to install in your LXD container because that is totally up to you.
How it works
Raspberry Pi is the physical device that will function as a server, a VeraCrypt-encrypted file container stores the actual services you want to keep secure (in my case: an Apache 2 web server with SVN for the source code of my own applications and a PostgreSQL database server for my project and resource management system), LXD is the service that's running a guest operating system (in my case: Ubuntu Server) in the encrypted file container and it works like a virtual machine except that we don't need a full virtualization this time, we just want to separate the services managing our confidental data from the rest of the system and to make sure it's fully accessible on our network without any advenced tricks and finally, the guest operating system is the one, on which you want to install your confidetal services. You may also want some shared directory between the host operating system and the guest and some port forwarding so you can access your services on the guest operating system easier.
Install dependencies
It is safe to assume you already have a functioning Raspberry Pi with a Linux-based operating system installed. I'm using a Raspberry Pi 5 device with 8 GB RAM and a large SD card. This device is the newest model at the time of writing this article. I'm using the 64 bit Raspberry OS designed for this device. It's based on Debian Linux so the way I have to install my stuff on it is very similar to Ubuntu I already know.
VeraCrypt
Install VeraCrypt first. This may be the hardest part actually because I could never get to install VeraCrypt from a package file, I had to download its source code, compile it and then install the compiled application. It sounds hard but actually it's very easy once you know which version works on your system. You want to download the one that was developed for Arm processors since we are using a Raspberry Pi device and not a PC with more advanced functions.
Information about dependencies and how to compile it successfully should be provided in the source code but you may need to install the following packages first to compile it successfully: tar, wget, libwxgtk3.2-dev, libfuse-dev, yasm, g++, make, pkg-config. On Debain-based Linux systems (such as Raspberry OS), you can install these packages with the following commands:
sudo apt-get update
sudo apt-get upgrade
sudo apt-get install tar wget libwxgtk3.2-dev libfuse-dev yasm g++ make pkg-config
I was looking for a long time for a version that works perfectly on my Raspberry OS. Finally I got it working by running this command in a previously created empty directory to download the version I need:
wget https://launchpad.net/veracrypt/trunk/1.25.9/+download/VeraCrypt_1.25.9_Source.tar.bz2Then extract it by running this:
tar xvf VeraCrypt_1.25.9_Source.tar.bz2Navigating to the source code by running this:
cd srcThen I had to download a pacth for the source code by running this:
wget https://raw.githubusercontent.com/archlinux/svntogit-community/packages/veracrypt/trunk/wx-3.2-size-warnings.patchThen, apply the patch by running this:
patch -p1 < wx-3.2-size-warnings.patch...and then the regular compile stuff comes, finally. Compile the package first:
sudo makeIt will take a while. Go and get a coffee while it's compiling. Once it's finished, install the package:
sudo make installThen cleanup the temporary directory you created for the source code since you don't need it any more. (Source: https://github.com/veracrypt/VeraCrypt/issues/1046)
Now you can an encrypted file container with VeraCrypt. Make sure to start VeraCrypt as root to to create your file container with the correct file ownerships and permissions on it:
sudo veracryptVeraCrypt GUI is very informative about how to create a suitable encrypted file container, so it is strongly recommended to use that if you are working on a desktop environment. What you have to pay attention to is actually 1 little detail: make sure you format your file container with the same file system that you are using on the host operating system so the workflow with LXD service will be seamless. I'm always using EXT4 filesystem on my Linux installations so the file container will be formatted to EXT4 too. You don't actually need to create this file container on Raspberry Pi, you can use a stronger computer with another Linux system, all you need to to make sure is that you create the file container as root and you format it to use the same filesystem that your Raspberry Pi device uses. It's actually better to do it there (on a gaming or workstation notebook, for instance) and copy the file container on the Raspberry Pi SD card later as it will be created much faster - but the best option is obviously using an external SSD with Raspberry Pi and copy the file container there as it will work much faster then. The SSD can be formatted to any filesystem but the file container itself must use the same filesystem that the operating system of your Raspberry Pi device uses so file ownerships and permissions will be preserved. Make sure your host filesystem can handle large files so you can use the file container without any problem.
Now that we have VeraCrypt installed and we have a working file container, we can proceed to the next step.
LXD Service
A user-friendly web-based interface is now a part of LXD service by default and we really want to install that so we can manage our LXD containers much easier. The only problem is that version of LXD comes as a Snap package so we have to install Snap containers first:
sudo apt-get install snapdThen we need to update Snap repository:
sudo snap install snapdNow we can install LXD service using Snap:
sudo snap install lxdOnce it's installed we initialize the service with the following command:
sudo /snap/bin/lxd initIt will ask a few questions and it's recommended to accept the default except for the following:
Name of the storage backend to use (btrfs, dir, lvm, zfs) [default=zfs]: dir...because we want to install our container in a directory on a VeraCrypt-encrypted file container. We also want to setup a network bridge so we can access our LXD container easier. We want LXD to be available on the network too:
Would you like LXD to be available over the network? (yes/no) [default=no]: yesOnce the initialization is completed, we can access our LXD management interface from our web browser:
https://<your.server.ip.address>:8443/...or simply https://127.0.0.1:8443/ of you are working on your Raspberry Pi device directly.
Now you have to setup a certificate and import it to your host system to enter the management interface. carefully follow the instructions on the page.
Create the LXD container
Once you are logged in the management interface, mount your encrypted file container previously created by VeraCrypt as root:
sudo veracrypt --text --mount /path/to/your/file/container /media/veracrypt1...and create an empty directory for the LXD container. You can call it anything you want (in my case, it's simply: lxd):
sudo mkdir /media/veracrypt1/lxd...then go back to the LXD management interface and create a new storage pool on the encrypted file container:
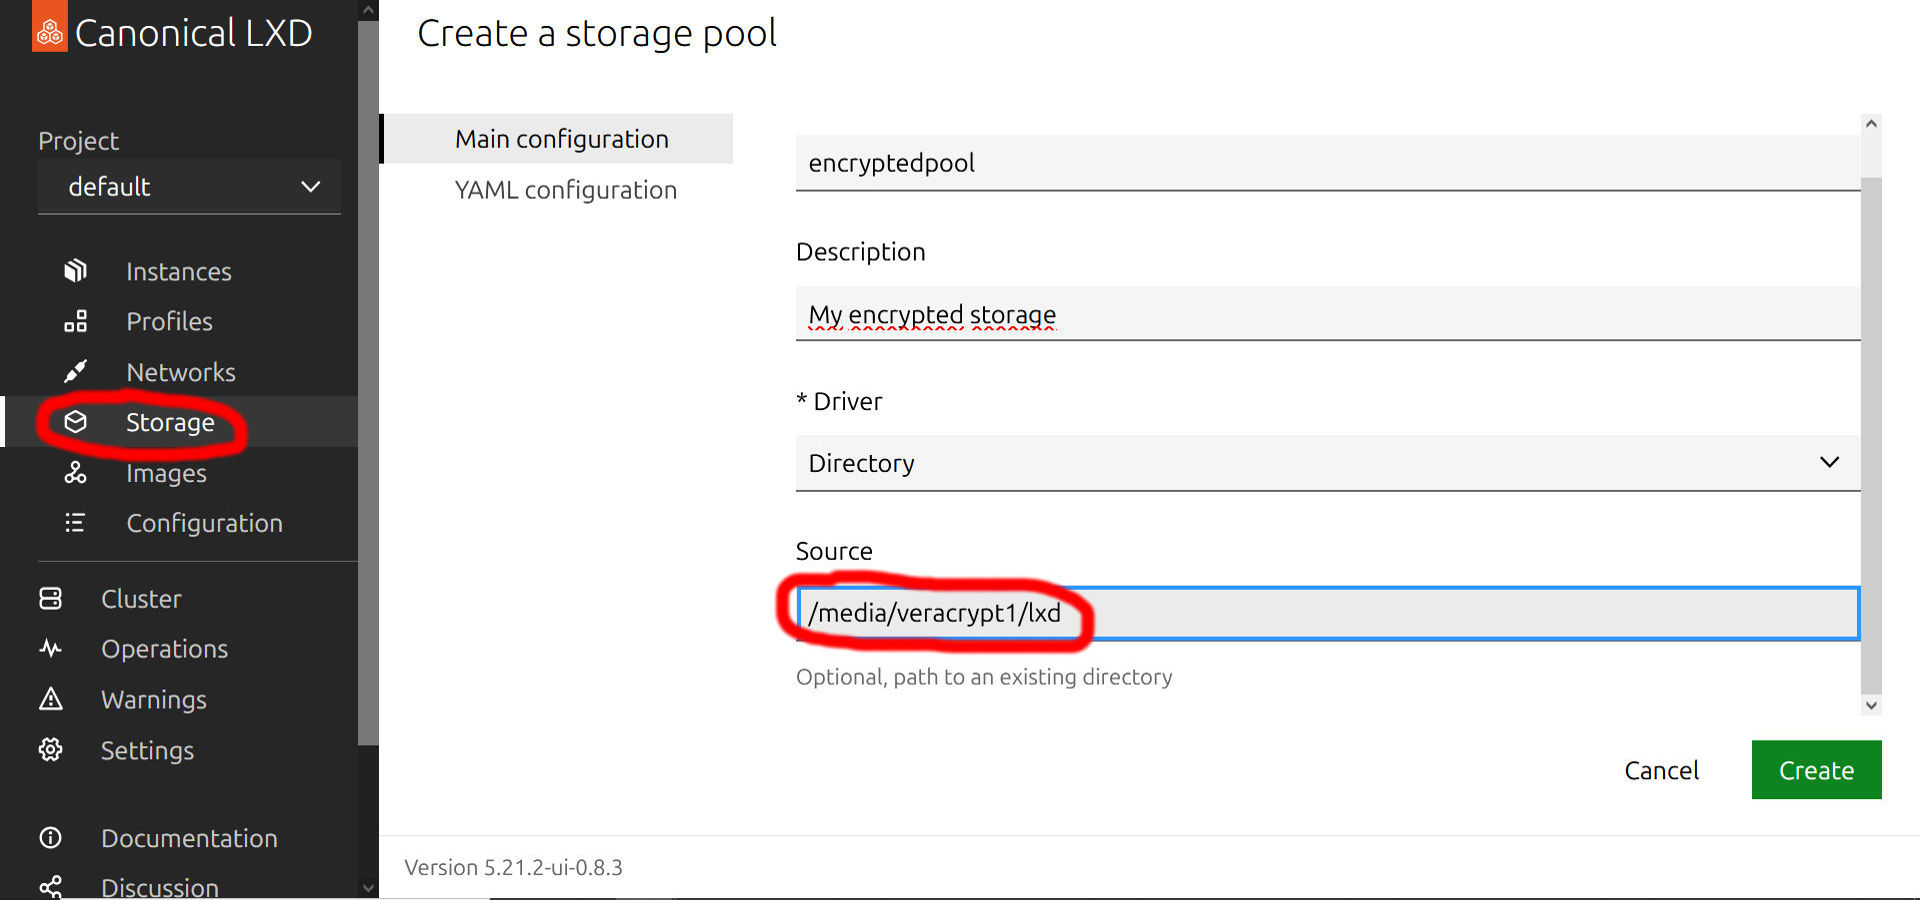
Once the pool is created, navigate to the Instances and create a new instance using an image of the guest operating system you want to install. This can be any of the available guest operating systems in the official LXD repository. On the figure I'm using a custom image, on which I already installed a lot of things, but originally it was a standard Ubuntu Server OS so you can choose that image for your first instance. I recommend you to use the latest Ubuntu Server image.
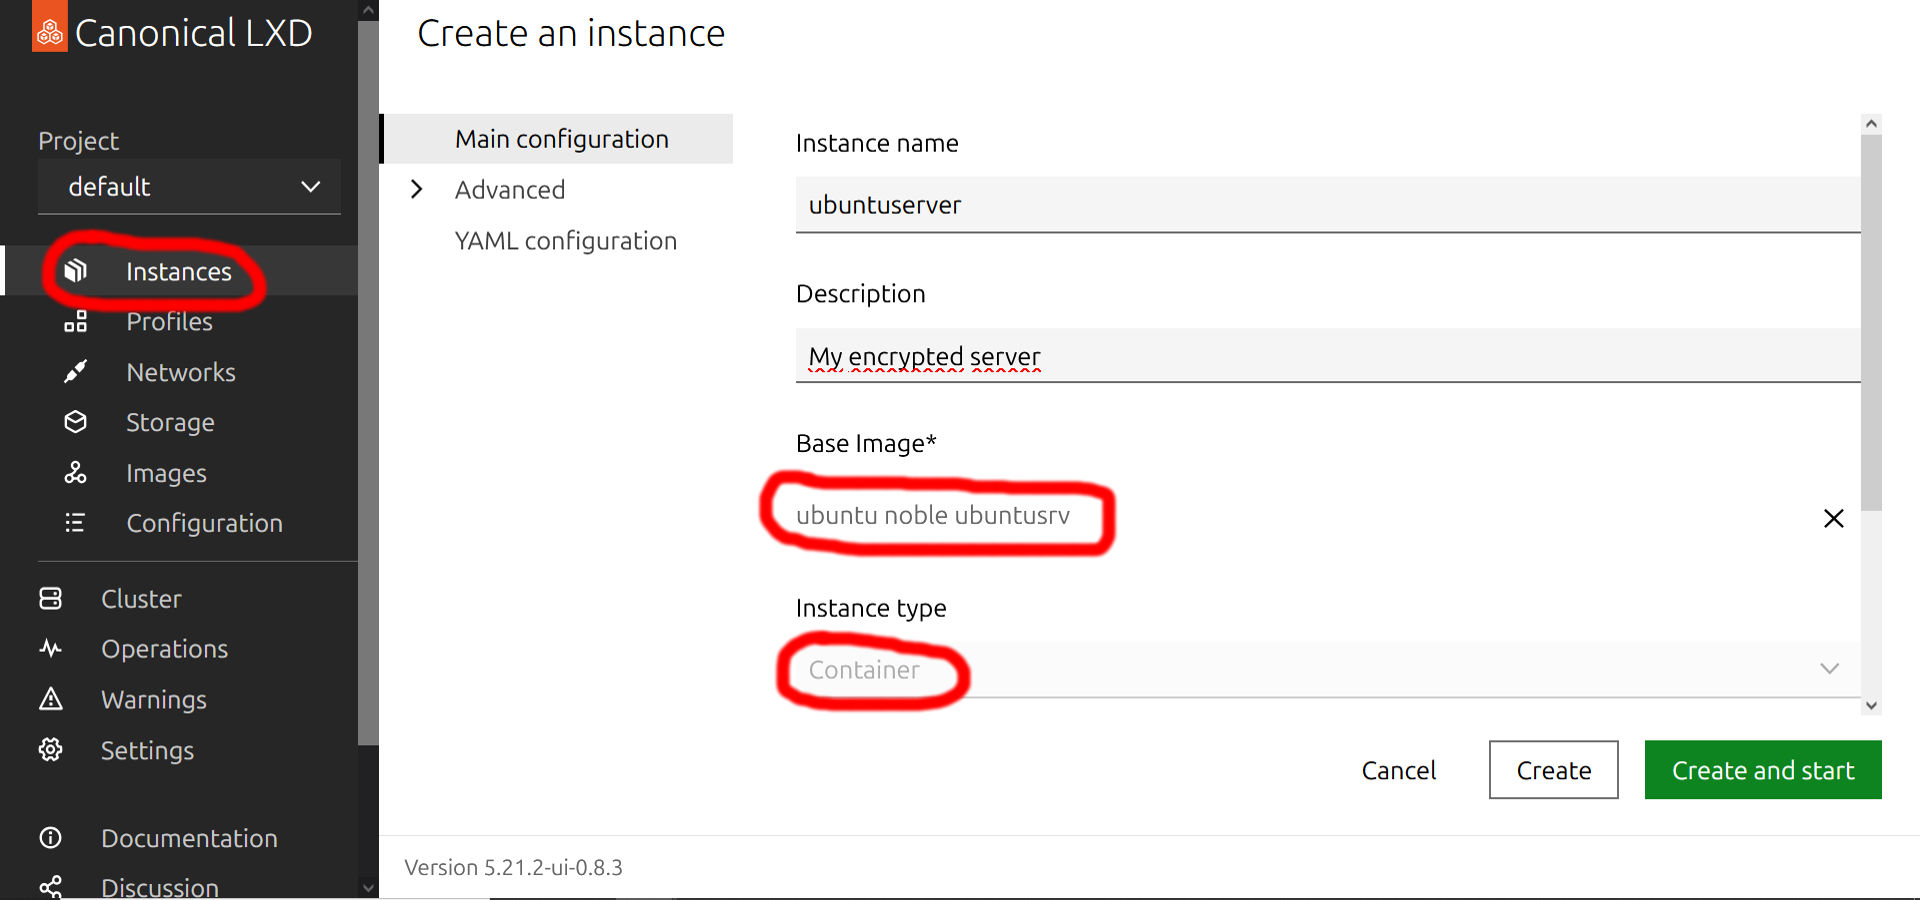
Before you go on and hit the 'Create and start' button, you still need to adjust a few things. Roll down the Advanced section, navigate to the 'Disk devices' subsection and set the encrypted pool as the storage device of the new instance:
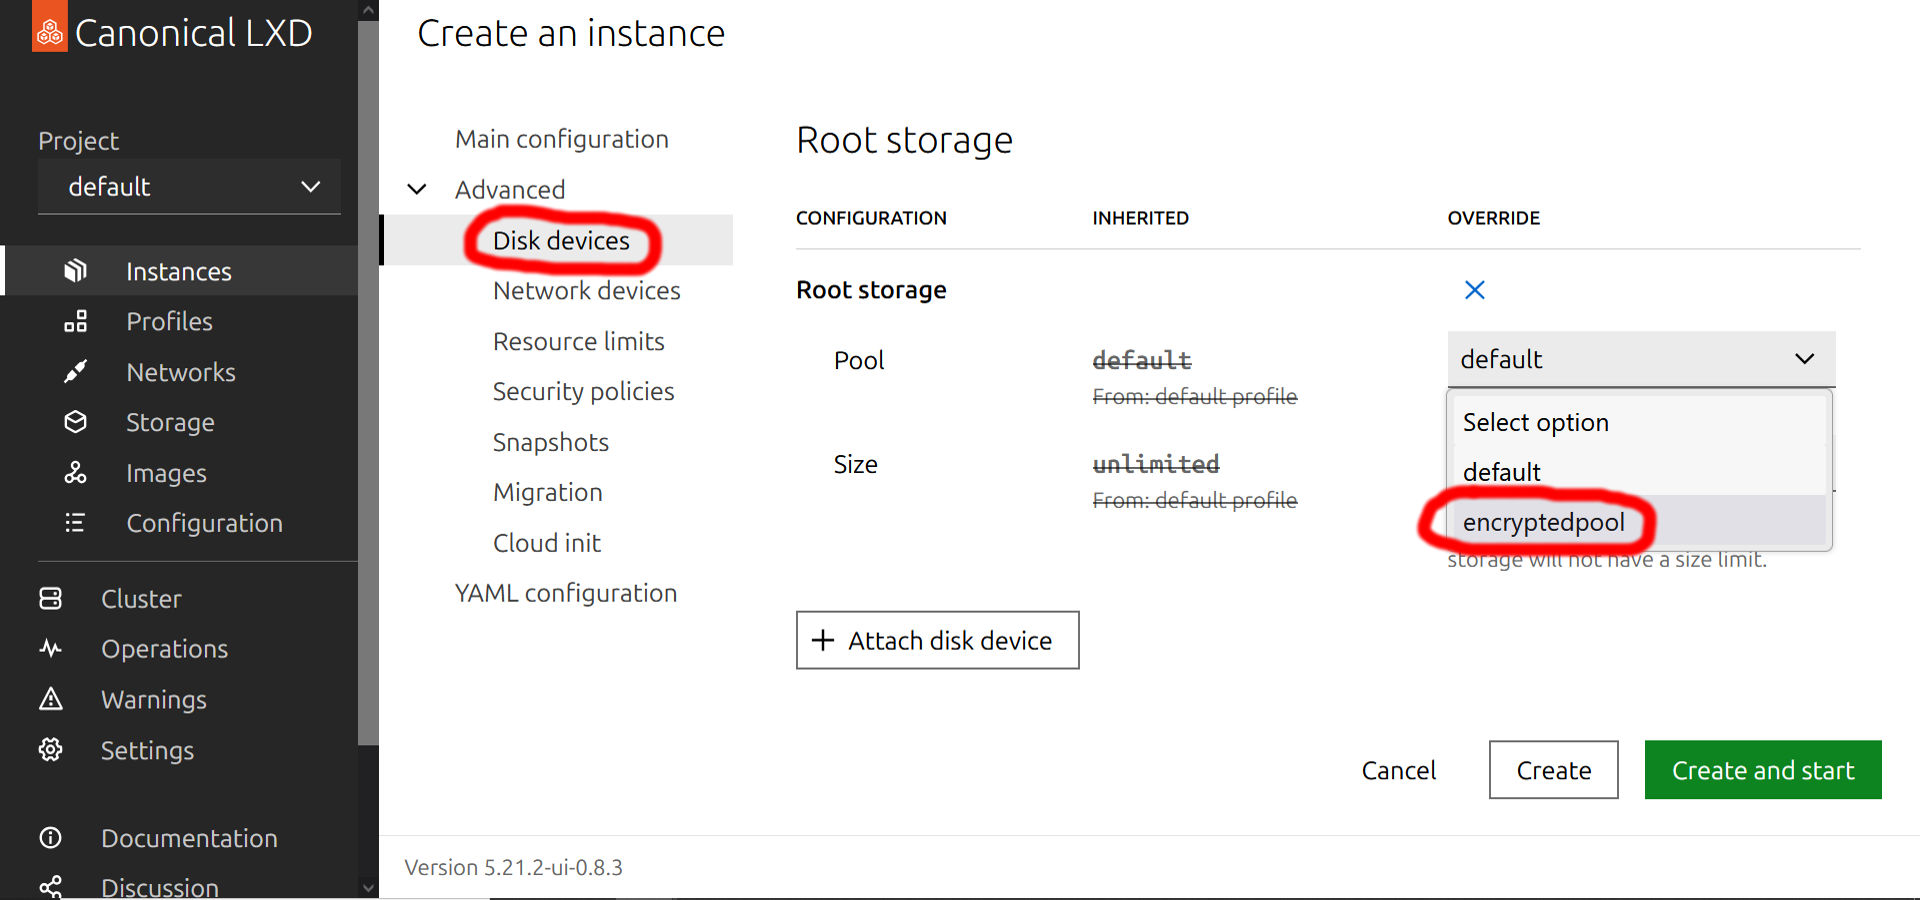
You should leave the Size of root storage empty so the entire file container will be used. The actual limit will be the size of your VeraCrypt-encrypted file container, of course. You can leave the rest of the details on their default values.
Now you can hit the 'Create and start' button if you want to and start installing the services with your confidental data on the container but I'd like to add a shared directory between the host operating system and the container first and some port forwarding too, so instead of starting it, I just hit the Create button and go back to my root terminal.
To create a shared directory (similar to the ones in VirtualBox, if you are familiar with that vitualization software), run the following command:
sudo /snap/bin/lxc config device add ubuntuserver public-directory disk source=/path/on/the/guest path=/path/on/the/hostChange /path/on/the/guest and /path/on/the/host entries to the ones on your actual system you created. In my case it's /public on both the host system and the container and the one on the host system is also a Samba shared directory so anything I copy here from a remote device on the same network is also visible within the LXD container too.
To create a port forwarding between the host operating system and the container, run the following command:
sudo /snap/bin/lxc config device add ubuntuserver dynamic-proxy proxy listen=tcp:0.0.0.0:<port-on-the-host> connect=tcp:127.0.0.1:<port-on-the-guest>In my case, I want direct access to my SVN and web server running on port 443 in the container but I also want to make sure there are no conflicts with the ports of the host system even if I install Apache 2 web server on the host system later, instead of redirecting port 443 of the container to the same port on the host system, I'm redirecting it to 7443. This is the port I'm using for VisualSVN Server on Windows systems but on Raspberry Pi, this port is free. So for my system, the command actually looks like this:
sudo /snap/bin/lxc config device add ubuntuserver dynamic-proxy proxy listen=tcp:0.0.0.0:7443 connect=tcp:127.0.0.1:443Now we can go back to LXD management system and start the container. You can do this in the Instances menu. In my case, after starting the container, to access the web server with SVN server installed in the container from any device on the same network, I have to use the following link:
https://<raspberry.pi.ip.address>:7443/<repository_name>/To shut down the container properly, navigate to the running instance, click on its name and navigate to the Terminal tab:
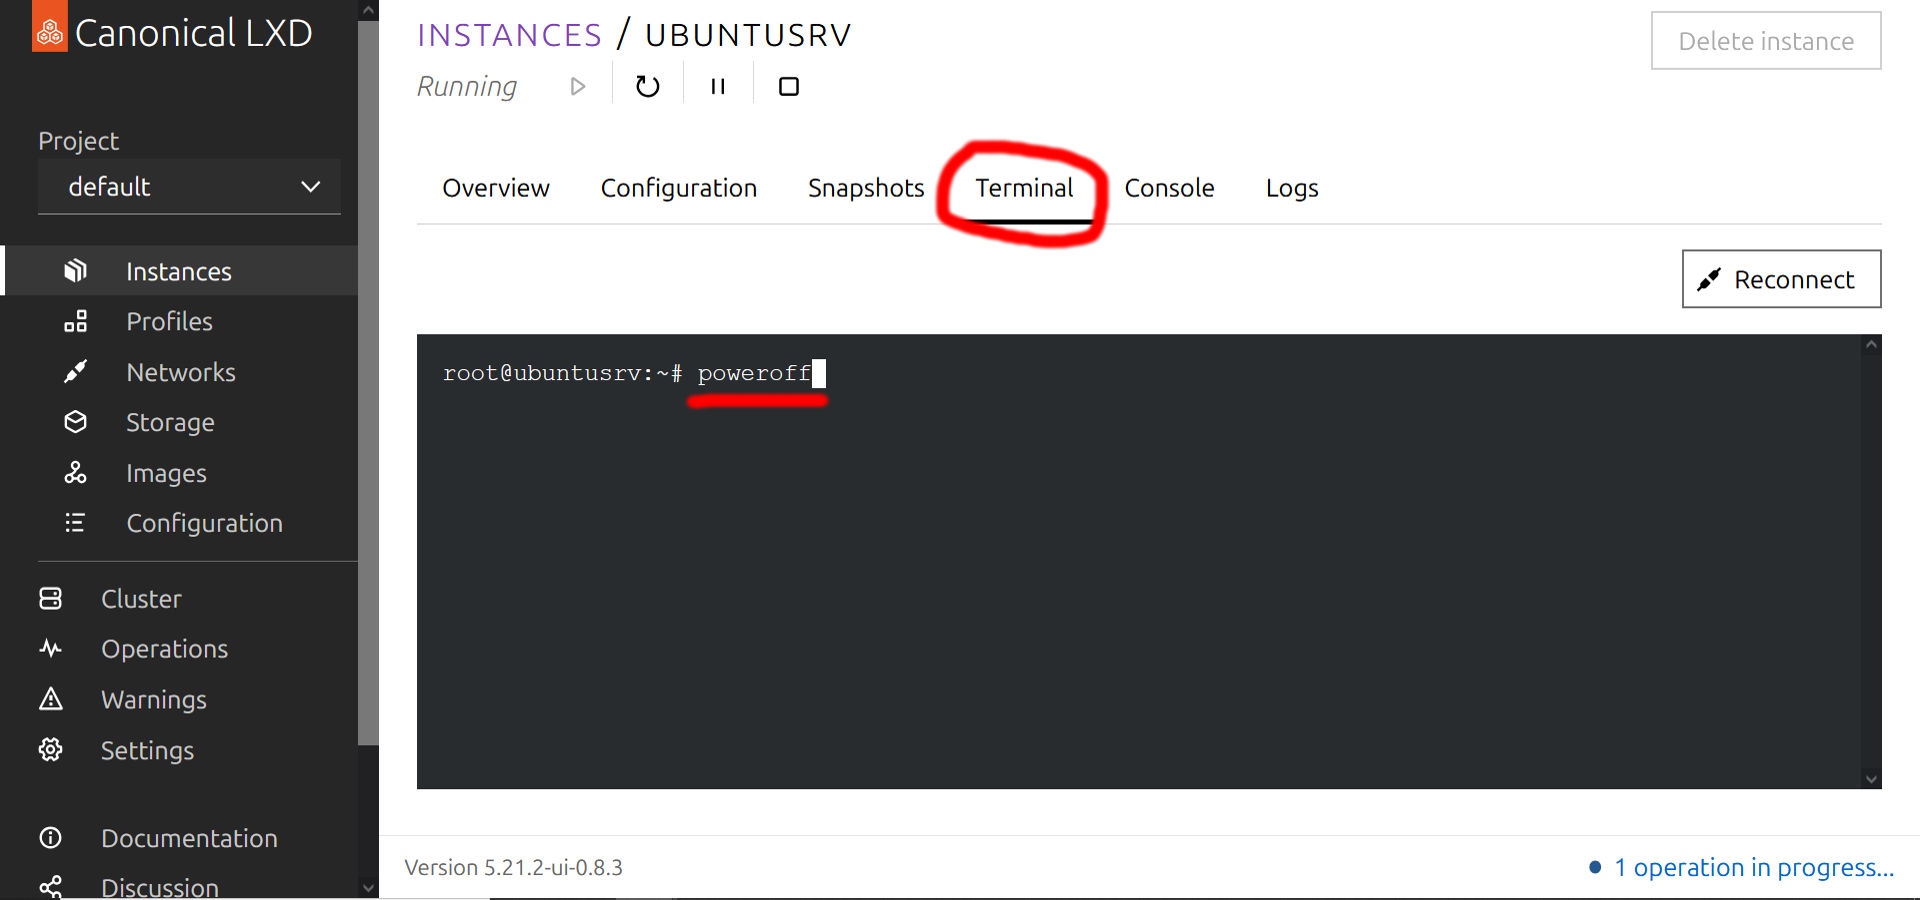
Type poweroff (like you'd do it in a normal Debian-based server) and press enter. Your LXD container will shut down in a few seconds. And this is it! Now you have a working LXD container in a VeraCrypt-encrypted file container.
Automation
We don't like this solution yet! It's too hard to mount the file container first, then restart the LXD service to find the mounted filesystem instantly and finally start the LXD container itself! We want to make it at least semi-automatic so all we have to provide it to start properly is the name of the encrypted file container (in case if you have multiple) and the correct password. To achieve this, we write a few scripts.
Let's assume your encrypted file container is located in the /root/virtual_machine directory as container.dat! To make mounting the file container and starting the LXD container easier, let's use the following bash script (/root/virtual_machine/start_encrypted_lxd.sh):
#!/bin/bash
# Check if the filepath argument is provided
if [ -z "$1" ]; then
 echo "Usage: $0 <path_to_encrypted_container>"
 exit 1
fi
# Assign the container file path to a variable
CONTAINER_PATH=$1
# Check if the file exists
if [ ! -f "$CONTAINER_PATH" ]; then
 echo "Error: File '$CONTAINER_PATH' not found!"
 exit 1
fi
# Mount the VeraCrypt container to /media/veracrypt1
echo "Mounting VeraCrypt container..."
sudo veracrypt --text --mount "$CONTAINER_PATH" /media/veracrypt1
# Check if the mount was successful
if [ $? -ne 0 ]; then
 echo "Error mounting VeraCrypt container."
 exit 2
fi
echo "Successfully mounted VeraCrypt container to /media/veracrypt1."
# Wait for 3 seconds
sleep 3
# Restart the LXD daemon (snap version)
echo "Restarting LXD daemon..."
systemctl restart snap.lxd.daemon
echo "LXD daemon restarted."
# Wait for 3 seconds
sleep 3
# start ubuntuserver container
echo "Starting 'ubuntuserver' container..."
/snap/bin/lxc start ubuntuserver
# Check if the command was successful
if [ $? -ne 0 ]; then
 echo "Failed to issue the start command for 'ubuntuserver'."
 exit 3
fi
echo "Container 'ubuntuserver' started."
This script will take its parameter, pass it to VeraCrypt and mount it to /media/veracrypt1 if the correct password is supplied, then restart LXD service and start the LXD container automatically.
We also need the opposite of this script: stop LXD container (if not stopped already), stop LXD service, then dismount the encrypted file container properly so we write the following bash script too (/root/virtual_machine/dismount_encrypted_lxd.sh):
#!/bin/bash
# Stop the container gracefully
/snap/bin/lxc stop ubuntuserver --timeout=60
# Wait for 3 seconds
sleep 3
# Stop the LXD daemon
systemctl stop snap.lxd.daemon
# Wait for 3 seconds
sleep 3
# Dismount the VeraCrypt volume
veracrypt --dismount /media/veracrypt1
echo "LXD daemon stopped and VeraCrypt volume dismounted successfully."
This script will stop the LXD container and the service, then dismount the file container.
If you want an easy backup solution, you can use the following bash script (/root/virtual_machine/backup_encrypted_lxd.sh):
#!/bin/bash
# Container name
CONTAINER_NAME="ubuntuserver"
BACKUP_PATH="/media/veracrypt1/backup"
# Create a new image from the running container with the same name
/snap/bin/lxc publish $CONTAINER_NAME --alias $CONTAINER_NAME
# Wait for 3 seconds before exporting the image
sleep 3
# Export the image as a tar.gz backup
/snap/bin/lxc image export $CONTAINER_NAME $BACKUP_PATH/$CONTAINER_NAME
# Inform the user of completion
echo "Backup of $CONTAINER_NAME has been created and exported to $BACKUP_PATH/$CONTAINER_NAME.tar.gz"
This script will create a compressed image of your LXD container (assuming /media/veracrypt1/backup directory exists) that you can use as a template later to import everything you created within the LXD container back to LXD service (or to import it to a different device). Before running this script, make sure your LXD container is stopped but the encrypted file container is still mounted and LXD service is running.
All 3 scripts must be run as root so (assuming your scripts are located in the /root/virtual_machine directory), run the following command to change their ownership:
sudo chown root:root /root/virtual_machine/*.sh...and the following command to change their permissions so only the root user can execute them:
sudo chmod 700 /root/virtual_machine/*.shDone! Now we have a fully functional encrypted mini-server on our Raspberry Pi device!
Summary
What we actually did so far:
- We installed Verarypt for encryption and LXD service for creating virtual machines / containers;
- We created an encrypted file container with VeraCrypt and created an LXD container / virtual machine with LXD service within this file container to run a secure, encrypted Ubuntu Server operating system that can handle confidental data without exposing it in the case of the hardware is stolen (or the host operating system is compromised when the encrypted file container is not yet mounted);
- Finally, we made the entire start/stop/backup function semi-automatic so we can manage the services faster.
Why is it good for us when there is an option to encrypt the entire filesystem the host operating system is running on? Because if we encrypt the entire host operating system, we have to sit in front of the device to provide the correct password when we want to start it (this is particularly 'pleasant' when there's no screen and keyboard plugged in the device as we are using it only as a server) but we have the option to reboot the entire device remotely when we leave the host operating system unencrypted and encrypt only the critical services (so the host operating system is used as a launcher only).

Comments